DEEPLABCUT
Local Environment building(GPU Version)
My environment version
- conda
- cuda
- cudnn
- cudatoolkit
- torch
- torchaudio
- torchvision
- Visual Studio 2022
- 4070TS 16G显存
How to SETUP
Way 1
-
Download the
.yamlfile locally from the Deeplabcut home page -
1
2
cd Path_to_your_yaml_file
conda env create -f DEEPLABCUT.yaml -
If errors occur, you can use
1
conda env update -f DEEPLABCUT.yaml
to continue to create your env or update your env
-
If the cuda version is still CPU, then you need to install pytorch gpu version correctly(refer to Way 3)
Way 2
-
Download the
.yamlfile -
Import
.yamlfile in the anaconda console to create the target env directly
Way 3(Recommend)
1 | conda create -n deeplabcut3 python=3.10 |
How to Check Pytorch Version
1 | python |
How to Start
1 | python -m deeplabcut |
How to Use
-
Prepare your videos
-
Edit the config file
- Define your keypoints and skeletons
- Define your extracted frame number
- Define your cut off probability
- Define your engine type
- Define your label parameters
-
Extract Frames
- Uniform: pick uniform frames
- Kmeans: pick key frames
-
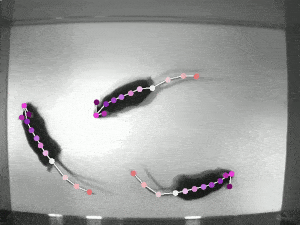
Label Frames(Napari GUI)
- You need to label exactly, because it will have a significant influence on your training dataset and the final effect.
- Generate a csv file, saving the pixel position of keypoints
-
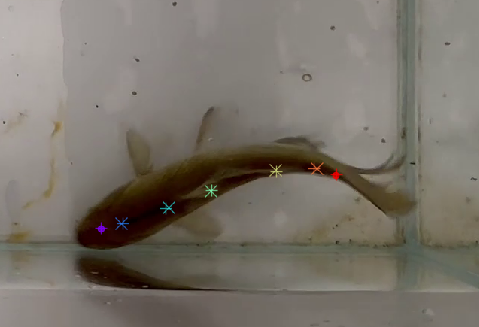
Check Labels
- Generate Labeled pictures
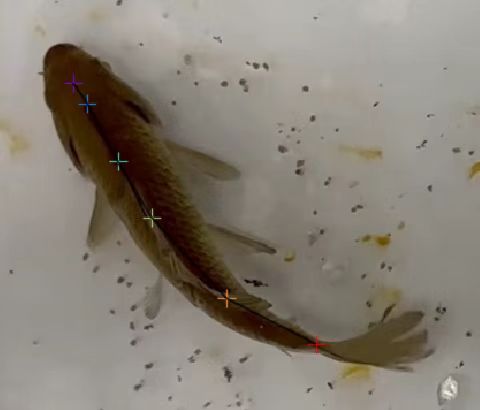
- Generate Labeled pictures
-
Create Training Dataset
- Choose your network and create the corresponding dataset
-
Training Model
- Edit training config file
- Batch size: Improve the training speed, but need enough 显存
- Learning rate: Choose correct lr. Too low, the longer training time. Too high, lead to the vibration problem, which means lower performance.
- Display iteration/Save epoches/Max snapshots
- Runner
- Load weights: False(Be careful!!!)
- You can load your trained snapshots to improve your models
- Edit training config file
-
Evaluate Model
- Metrics
- RMSE
- MAP
- MAR
- Metrics
-
Analyse Video
- Choose your target original video
- If your 显存 enough, you can increase your batch size to accelerate the process.
-
Create Video
- Choose correct cutoff value to get the final predicted video.
-
Improve Labels
- Refine your old labeled frames
- Add new labeled frames
- Create new training dataset
QA
-
CPU version can directly use but too slow, and if you want to use GPU version which is ten times faster than the former, you need to be careful to prepare your env. Many types of combination will lead to some tricky problems. Following the Way 3 is the most correct way to prepare your env.
-
While labeling, you need to label exactly. Otherwise, the keypoints in the created video will vibrate in a range.
-
While training, default parameters are well.
-
While creating video, if the final predicted video doesnot contain any plot, you need to change your cutoff value.
-
If you want to reuse your labeled data, you need to create a same name project and change a small part of content in CSV file.
-
Old versions of deeplabcut still have some problems and different versions can’t be mixed.
Comparison
- DEEPLABCUT
- DEEPSHAPEKIT
- SLEAP